Sunday, 27 September 2015

Omelette muffins

Here's a quick and easy way to make omelettes - in a muffin tin! It's simple and ready-to-go, apt for packing in a lunch box.


As with any omelette recipe, you can add any ingredients you like! Here I have carrots, celery, broccoli and onions; you can add cheese, ham, bacon or sausage too!


The omelettes had a pretty little dome when I first took them out of the oven, but they collapsed after they cooled down a bit.


Dome or no dome, it was some fluffy egg-goodness!


What?
  • 2 eggs
  • 1/4 cup milk
  • 1/2 tsp baking powder
  • Oil (just enough to brush the muffin tin)
  • Carrots, broccoli, onion, celery (or any other ingredients desired) cubed
  • Salt and pepper to taste
How?
  1. Beat the eggs with milk, baking powder, salt and pepper. 
  2. Oil the muffin tin.
  3. Distribute the omelette ingredients into the muffin tins (about 2/3 full).
  4. Pour in the egg mixture till it covers the ingredients.
  5. Bake in a preheated oven at 180 degC for 20-25 minutes.
  6. Cool for 3 minutes before removing the omelettes from the tin.
  7. Serve warm.

Saturday, 26 September 2015

Rose apple tarts

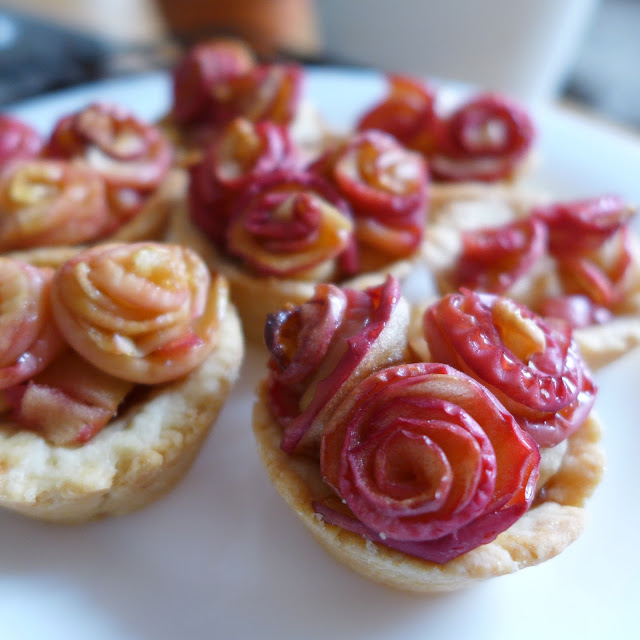
Inspired by the pictures of delectable apple tarts from the leaflet of the local grocery shop, I decided to make some myself this morning!


The ones from the leaflet used a a perfectly stripped skin of a peeled apple to make big apple-skin roses. I can never get how people manage to peel an apple in one single strip! Acknowledging my shortcoming, I found an easier way to make apple roses without testing the limits of my dexterity!


These roses are made with half-moon slices of apple, softened and caramelised with cinnamon sugar under low heat. I placed about 2-3 roses in one mini tart.


The base of the tarts are filled with chopped caramelised apples. It can be replaced with some chopped walnuts for some crunch! The roses may also be brushed with some warm strawberry preserve before serving to add sweetness and give them a more beautiful glow. But I think these would be sweet enough without. :) Serve warm.


Pastry crust
What?
  • 100 g plain flour
  • 50 g unsalted butter
  • 1 tbsp sugar
  • 1 tbsp milk
How?
  1. Mix the flour and sugar together and cut in the butter (cold and diced) with a fork or a pastry cutter. 
  2. When a crumbly coarse mixture is achieved, add in milk and lightly fold into a soft dough.
  3. Divide the dough into portions for one tart (depends on what size tart is desired; I used about 18 g for one mini tart) and roll the dough into a ball.
  4. Roll the ball into a round disc and place it in a muffin tin. Press the dough evenly up on the sides of the tin. Prick the dough in the tin with a fork.
  5. Bake in a preheated oven at 180 degC for 15 minutes.
  6. Remove from the oven and let the tart shells cool in the tin.
Rose apples
What?
  • 2 apples
  • 3 tbsp brown sugar
  • 1/2 tsp ground cinnamon
How?
  1. Finely slice 1 1/2 apples into thin half-moon shaped slices. (Great if you have a mandolin, but it can be done with a knife too!) Chop the rest of the 1/2 apple into small cubes.
  2. Mix the sugar and the cinnamon together and spread the sugar mixture into a non-stick frying pan.
  3. Heat at low heat and place the apple slices over the sugar mixture and cook for a minute.
  4. When apple slices become soft, transfer them onto a plate. Let them cool.
  5. Melt the remaining sugar mix,under low heat and mix in the cubed apples. Stir and cook for a minute and transfer them onto a plate to cool.
  6. Divide the chopped caramelised apples among the baked mini tart shells.
  7. To make the apple roses, roll one caramelised apple slice with the apple skin facing upwards, add another slice at the end of the roll and continue rolling. (I know this sounds a little awkward but it really is just that!) More slices of apple can be added to the roll depending on the size of roses desired.
  8. Place the apple roses on top of the chopped apples.
  9. Warm the apple tarts in a preheated oven at 180 degC for 10 minutes or until the tarts are golden brown.


Sunday, 20 September 2015

Madeira lemon loaf cake

Summer has officially come to an end (or technically it will in 2 days). It is starting to feel a little chillier around here as I found myself lingering a little longer under the cosy warmth of that 13.5 tog duvet in the early mornings.


I think my body is preparing for hibernation mode. It moves a little slower, feels a little heavier - like I have to lug that lazy weight around when I step out of bed, wobbling and swaying like a flubber (remember that green rubbery bouncy substance from a Disney film?).


It is a beautiful day, nevertheless. We've got sunshine ~ on a cloudy day... I have decided to warm up the place a little with some oven heat.


Madeira cake is a classic English sponge cake, much similar to a pound cake. I did a search and found that "Madeira" is actually a Portugese archipelago. This cake was named after Medeira wine from the islands which was popular in England and often served with the cake back in the 18th century.

Goes well with tea too!


What?

  • 200 g plain flour
  • 2 tsp baking powder
  • 0.5 tsp salt
  • 100 g caster sugar 
  • 150 g light olive oil
  • 2 eggs
  • zest and juice of 1 lemon
  • 1 tbsp milk

How?

  1. Sieve the flour, baking powder and salt.
  2. Mix in the sugar (I used 50 g brown and 50 g caster sugar).
  3. Mix in the oil and the eggs, one at a time.
  4. Add the lemon zest and juice and mix until combined.
  5. Add in the milk last and give the batter a quick stir.
  6. Bake in a preheated oven at 180 degC for 60 min, or until a skewer inserted comes out clean.
  7. Transfer it to cool on a wire rack after it cools a little.

Sunday, 13 September 2015

Tamagoyaki


With more time on my hands on a cheery Sunday morning, I decided to make myself some Japanese egg roll for breakfast. Or you can call it a pre-lunch appetiser given that it was already almost noon...


My recipe calls for simple ingredients in my kitchen: chopped carrots, celery and onions, a tablespoon of milk, dash of salt, pepper and basil. No fancy equipment either: no rectangular omelette pan, no bamboo mat... But no compromise in taste! :)


To get the silky smooth egg texture, use a sieve to sieve out the chalaza. Everything can then be mixed together as you would in a normal omelette, and you can start frying and rolling!


The omelette roll should be left to cool for a while before slicing it with a sharp knife to obtain a nice clean cut. I should sharpen mine...


This would look pretty cute in a lunch box.


Itadakimasu!


What?
  • 3 eggs
  • Onions, carrots, celery chopped (about a tbsp each)
  • 1 tbsp milk
  • 1/4 tsp salt (to taste)
  • 1/2 tsp pepper (to taste)
  • 1/2 tsp basil (optional)
  • Oil to brush pan with
How?
  • Beat eggs and sieve it through a sieve to remove the chalaza.
  • Mix in milk, salt, pepper, basil and vegetables.
  • Heat a pan at low to medium heat and brush with oil.
  • Pour a layer of egg mixture into the pan and tilt it to cover the bottom of the pan.
  • When the egg has cooked for about 30 seconds, roll the egg from the corner and stop at the middle. At this point, the egg has not fully set; it will still be runny on top but firm enough to roll.
  • Move the egg to one corner of the pan and pour more egg mixture at the unrolled end of the egg. Tilt the pan again to spread the egg mixture evenly.
  • Repeat step 5-6 until all the egg has been used up.
  • Fully roll the egg and cool it for a while before removing from the pan; the egg roll is more fragile when hot.
  • When cool enough, slice the egg roll with a sharp knife into pieces of about 1/2 inch thick.

Friday, 11 September 2015

Konnyaku chrysanthemum jelly


Home sweet home. Been a week since I've been back! I was so excited to start baking again that I went on a mini baking shopping spree in the supermarket. Gathered some almond meal, baking powder, cocoa, chocolate, vanilla and flour. Then when I got back, I realised I forgot good ol' butter. GARH.

In need of a quick dessert fix, I decided to raid the pantry and the fridge to see what I can come up with. 


I found packets of konnyaku jelly powder sitting right there on my shelf! In place of fruits, I decided to make some jellies with chrysanthemum flowers.


Chrysanthemum flowers were first washed and boiled with about a litre of water. After sifting out the flowers, the jelly powder was then added while stirring.


These perky, bouncy chrysanthemum-flavoured little rounds are strewed with wolfberries for some natural sweetness.


A healthy and delightful treat for a quiet, pleasant evening. It feels good to be back. :)